Tuesday, January 25, 2011

Little Black Dress

Oh, the little black dress, also known as "LBD". They say every girl needs a LBD in their closet that can be used for any occasion. For the past few years, I have kept my eye out for a more sophisticated black dress than the few I have from high school/college...you know how those just have that "young" look if you will. What I found out from looking in stores is that any type of dress is really pretty expensive, or at least expensive to my frugal tastes.
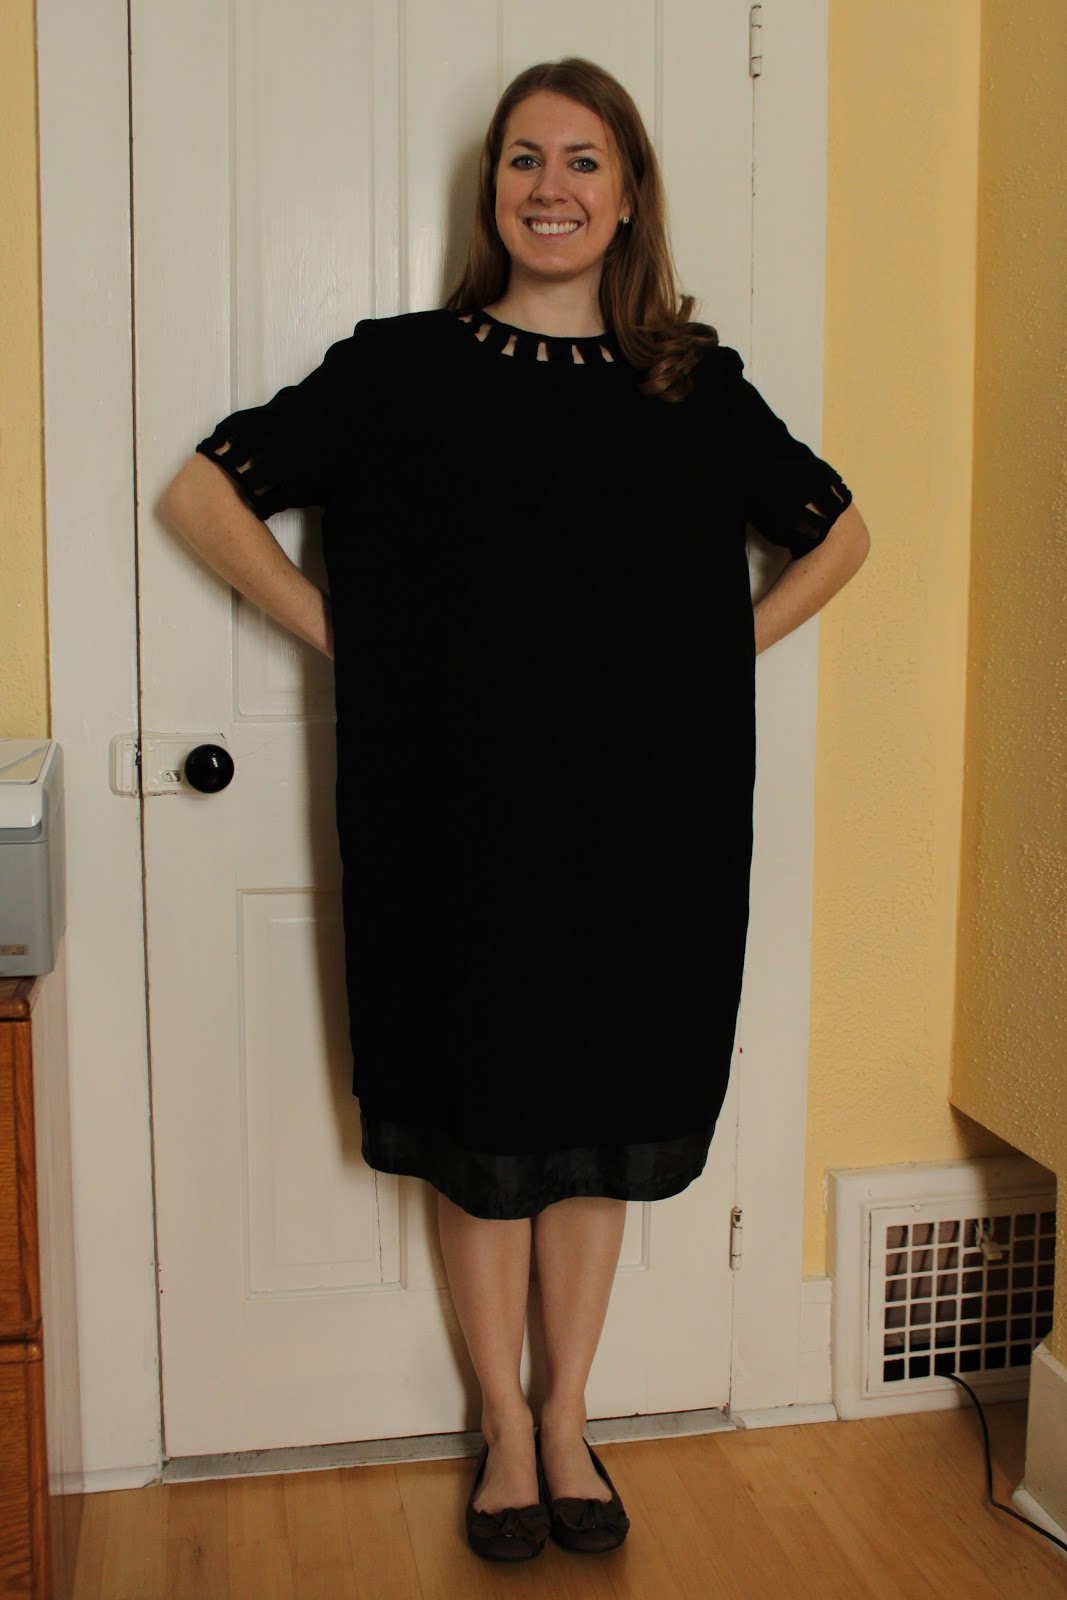
Naturally, when I ran across this dress in the thrift store, I thought, yeeess, this is awesome!


What I liked about this dress:

-Obviously, its a little black dress
-LOVE the neckline! I really like that the dress is plain except for that detail
-I also liked that the fabric was a medium weight and has a lining

Here is a little side story. The care instructions say dry clean only. I don't know about any of you guys, but I have been know to machine wash literally everything I own that says "dry clean only" (including many of the dresses on my blog, because you HAVE to wash stuff from thrift stores) and I let it air dry. I have never had any problems with any of my clothes...(knocking on wood)....Well I washed this dress in cold water and then forgot about it which resulted in it getting thrown into the dryer with the rest of the dark load. Well the dryer made the fabric shrink up; which positively, made the dress smaller, but also made the lining stick out of the bottom of the dress, haha!


So I'm going to blame the dryer for this result and continue to machine wash and air dry my "dry clean only" clothes! :)

Anyway, back to the dress at hand.
I started by taking the sleeves off...I really liked the cutout detail on the sleeves that matches the neckline, but I thought a sleeveless dress would be a bit more cute for this particular dress.


Even though the dress shrunk in the dryer, I still had to take it in quite a bit.


I actually took in the dress first and then worked on getting some shape into it. It was WAY easier to get the bulk of the fabric off first and then tweak it.

Another side note: sorry about the overexposed pictures.  It was hard to get a good picture of the black dress with light backgrounds.


I then sewed in new side seams.  I really like that this dress has lining, this is actually the first dress on my blog that has had a lining like this one. The only bad part was that since I didn't take the lining out, it was a bit difficult taking it in.


I ended up just using my seger to take in the lining.  After that was done and the extra showing at the bottom was hemmed, I sewed up the arm holes.


I left the arm holes a little long so that they have a slight cap sleeve look. I think they are cute! :)


And here is the finished little black dress, ready for any occasion that calls for it:


Props to my wonderful husband for taking this picture for me :) I'm enjoying his company today, because unfortunately, our furnace quit working last night and it was 58 in our house when we woke up this morning....brrrrr! We are waiting on the heating guy to fix it, so Andrew decided to stay home today. Needless to say, I was pretty much freezing in this picture, haha.

Speaking of my lovely husband....his birthday was on Sunday and I made him this cake from scratch:


It was actually supposed to be a red velvet, but looked more brown because I ran out of red food coloring and used some blue, haha. I was going to share the recipe, but it really wasn't as good as I thought it would be. When I find a better one, I will be sure to share! :)


Linked to:

Sew Much Ado's  We Did It Wednesday 

The Speckled Dog's Favorite Things Friday

504 Main's Tickled Pink  


Update:  This little black dress has been featured on 504 Main's Tickled Pink!  :-)

Tuesday, January 18, 2011

Flower-tastic

Is anyone else besides me ready for warmer weather? I'm sooooo ready. Anyway, here we are at another week which means another project! :)
The creation for this week reminds me of the classic school teacher dress:


It has ties in the back, no shape whatsoever and it has pockets! Now, usually I love those dresses that have pockets, but these pockets were not so darling...they just made the hip area extra big and bulky.

What I liked about the dress:

-I like the pattern, it has little pink, purple and yellow flowers
-I liked the v-neck

I started the transformation by taking out the shoulder pads.


There they are!

The dress was quite big, so I had to take in each side to make it fit, and give the dress some much needed shape.


I took it in quite a bit, which resulted in cutting off the pockets, in case any of you were wondering. :)


I then went to town stitching up the sides, and also serging so there isn't an unraveling fabric.


It was then time to shorten it up and sew a new hem.


Since the dress is kind of flowy, I wanted to make sure the skirt still had that feel, so I aimed for the skirt to hit at the knee.


Here is what we ended up with:


I couldn't find a belt that looked good with this dress, so I just tied the ties in the front instead of the back (though you can't see it very well in the picture). I envision this dress being worn out in a field full of flowers or even wheat, I am sooo ready for spring!! :)

On another note, you should all check out my Etsy page. My wonderfully talented sister makes this AMAZING beaded  jewelry, it is seriously soo pretty. I'm listing some of her creations on my etsy page, so keep an eye out for more to come!

On a side note, does anyone know how to put a button that links to other pages on your blog? I've seen other people have etsy buttons on their blogs I can't figure it out.

Linked to:

http://sewmuchado.blogspot.com/2011/01/we-did-it-wednesday_18.html

http://vintagerevivals.blogspot.com/2011/01/look-what-i-found-friday-party-time.html

http://thespeckleddog.blogspot.com/2011/01/favorite-things-friday-no-8.html

Thursday, January 13, 2011

Crafting and Baking

Two posts in one week?! I know, crazy! :) I just wanted to share with you all what I've been working on (in addition to sewing thrift store clothes) this week.

I've been so inspired lately to get in touch with my "crafty" side if you will, I don't know if its the cold temperatures, snowy ground, or what, but I've been so inspired and found some really cute ideas on blogs! Over at The Toasted Coconut I found this super cute Valentine's Day wreath. I thought that it was such a great idea, and you can imagine how many odds and ends fabric scraps I have lying around, just waiting for a project like this! And since I have pretty much no Valentine's Day decorations, what a great (and cheap since I didn't have to buy anything) project.

So I decided to get to work!


I took a wire hanger and bent it into a heart shape.


I spent most of the time cutting strips of fabric from various other projects I've done (recognize the red polka dot? or the pink and purple fabric?)


I then started to tie each one on the wire hanger.


And here is what it looked like after all the strips were tied on...It was kind of hard to see the heart shape now and it reminded me of a small fabric animal...haha so I decided to try to fix that.


Here is the finished product. I ended up taking a sheer silver ribbon and winding it around the hear shape to hold some of the fabric down and to define the hear shape a bit more. I really like it! :)

The second thing that I want to share with you all is this super yummy homemade bread recipe.
Here is a little back story for you:

Earlier this fall, a friend and I went to a nearby Amish community. They have some stores to sell their goods and I bought this loaf of oatmeal bread, and it is seriously some of the best bread I have ever had.
So, because of my love of baking, I came home and decided I HAD to figure out how to make that bread at home.

After a lot of google searches, and my own experimentation, I think I have figured it out so I will share it with you.
A side note: its really not hard to make at all, it just requires time and some patience :) 

Homemade Oatmeal Bread

-2 pkgs. active dry yeast
-1/2 c. warm water (for yeast) and 1 1/2 c. more warm water (2 c. total)
-1/3 c. peanut oil
-2 tsp. salt
-1/2 c. brown sugar
-2 1/2 to 3 c. all-purpose flour
-2 1/2 to 3 c. whole wheat flour
-2 c. cooked oatmeal
-any add-ins you would like such as dried fruit or nuts (optional)

Soften the yeast in the 1/2 c. warm water for 5 minutes. Add the sugar, 1 c. of the flour, 1 c. of the wheat flour and the rest of the warm water. Mix well.

Add in the salt, oil, and oatmeal. Add in flour a little at a time until a soft dough is formed-it should pull away from the side of the bowl (it will be sticky).

Turn out onto a lightly floured surface and knead for 10 minutes. Knead in any add-ins you are using.

Place dough in an oiled bowl, turning to coat all sides. Cover and let rise in a warm place for 1 hour, until doubled in bulk. Note: I've found the easiest way to have a warm place is to heat up a bowl of water in the microwave, making the microwave nice and warm and then place your dough in there.

After doubled in size, punch down and form into 2 or 3  loaves (depending on how big you want them). I know there are probably a lot of ways to form into loaves, but this is what I do:

Use a rolling pin (floured surface) to roll out into a rectangular shape, and then roll dough up from the short side.

Place loaves in oiled pans and allow to rise, about 45 minutes. Brush tops with egg yolk wash if desired, and sprinkle some oats over the top. Bake at 375 for 40 minutes.

Sooo good! When I made this recipe earlier this week, I made one of my loaves into a dessert bread-before I rolled up the dough into a loaf, I brushed it with melted butter and sprinkled a cinnamon and brown sugar mixture on top, then rolled it up and baked it. It is my husband's favorite now! I bet it would be good if you put in some raisins to make a cinnamon-raisin bread...mmmmm! The possibilities are endless!

Happy crafting and baking! :)

Tuesday, January 11, 2011

A Little Bit of 50's Flare

This week's project was a fun one! It was one of those projects where I initially had a different idea but ended up doing something completely different. You know how that goes, it happens to everyone right?
Here is what I had to work with:


Yep, this is a mumu (size 3x actually) and yes, I am wearing jeans and a sweatshirt underneath. So what did I like about this?

-Lots and lots of fabric to work with!
-I liked the red polka dot (go figure! haha)

So, ever since I bought this (which was before we went to Europe) I was thinking I wanted to make it into a cute little apron. Well, I started to work on it and all of a sudden an A-line skirt popped into my head! Cute! So I changed gears and went with the skirt route, which really worked out well since this has a zipper down the front.

I decided to make the top of the skirt start right under the current arm pits.


I then had to bring the waist in a lot, to make it fit and to get the A-line shape.


After I cut the shape, all I had to do was sew down the sides.


I don't know why this picture is sideways...sorry, you get the idea though :)


Sewing sewing...


I also serged the side seams.


The only thing left was the waist. I cut the zipper down to size, and pinned around the waist. So the original front (with the zipper) is now successfully the back of the skirt.


While I was working on this, I decided it reminded me of a 50s style skirt, hence the name of this post. And if you don't know, I LOVE vintage/retro looking clothes...in fact, I've always said that I was born in the wrong time period...haha.


I think this is one of my favorite pieces so far! And yes, I confess I did spend some extra time on my makeup...I wanted it to match and what else is there to do when it's snow-storming outside? :)


Linking to:
http://thespeckleddog.blogspot.com/2011/01/favorite-things-friday-no-7.html
<center><a href="http://sewmuchado.blogspot.com/"><img border="0" src="http://i807.ph

Thursday, January 6, 2011

J'adore Paris...and London! :)

We had an absolute great time in London and Paris last week! The week seemed to go by so fast, it was hard to fit in everything we wanted to do/see. I'm glad to say that the long flights weren't nearly as bad as I thought they would be. The longest flight I had ever taken before this trip was 4 hours, so you can see why I was a little apprehensive about a 6 hour flight from Boston to London and then a 9 hour flight from Paris to Chicago. Besides a few upset children here and there, the plane rides weren't too bad!

I posted some pictures from our trip on my facebook page, but since then I have edited and watermarked some of the better ones that I'll share for all of my blogging friends! :)

We went to London first and hit all the major attractions:

Buckingham Palace
 So this was taken right after we got off the plane...after being up for 24 hrs, so that explains our tired smiles :)


Westminster Abbey
Sooo beautiful on the inside! So glad that we took a morning to go through it.


The National Gallery
 Lots and lots of great art!


Millennium Bridge
 For all you Harry Potter fans! :)


Big Ben

 This might have been my favorite thing to photograph, it was so stunning during the day and night!


Westminster Abbey
 I was just in awe at all the detail in these buildings, just amazing!


Tower of London
 We were able to hear a tour guide (which was a Beefeater) tell stories as he walked us around, it was really cool.


London Bridge

 Right next to the Tower of London.


London Eye
The London Eye was very pretty at night, unfortunately we didn't have time to take a ride, it goes super super slow...it takes like 45 minutes.

And...on to Paris!


Notre Dame
Once again...so pretty at night!


Versailles
 We took a morning and went out to Versailles. The palace was sooo grand.


The detail on the walls

So breathtaking!


Statue in the gardens
The gardens at Versailles were huge!! I bet it is gorgeous in the spring and summer.


Sacre Cour
This church was way up on a hill (there were A LOT of stairs to climb) and you can see for miles, though it was a bit foggy the night we went, but the fog made it seem kind of dreamy.


The Eiffel Tower
Yay!


The Eiffel Tower


Lovers at the Eiffel Tower


Haha, okay I have no idea if these random strangers are lover or not, but what a great picture! My lovely husband took this one.


Arc de Triomphe
Was very very big, much bigger than I thought it would be.


We took around 800 pictures, so obviously these are just a few. I was so happy that we were able to meet up with my roommate from college and her fiance in Paris as well!
Oh, and if anyone is wondering, AR squared Photography is because Andrew and I have the same initials, and we are math/chemistry nerds, hence the "squared" part. :)

And on to my attempted thrift store transformation for this week....

Here is the story:
I worked on this dress which I've decided that I don't like so much now...it happens to all of us right? So, I have plans to use the fabric for a project in the future.
Also, Andrew is building a new computer and somehow I have lost the original picture of this dress that I took (and put on his computer and not my laptop)...so I'm sorry for this week being a disappointment! Here are the pictures I do have:


The original top.


I cut it off and made it into a strapless top.


So this is what I finished with. I was going to shorten it, but then I decided that I will (most likely) be using the fabric for something else, so I didn't want to cut any off.
Next week, we will be back on track! :)

Side note: I tried to find some dresses on our trip, but I only found one vintage resale shop and wow, was it expensive!